Blessed Robert Grissold Catholic Church by Sasha Ward

Entrance to the church, by architect John D. Holmes 1994.

Entrance to the church, by architect John D. Holmes 1994.

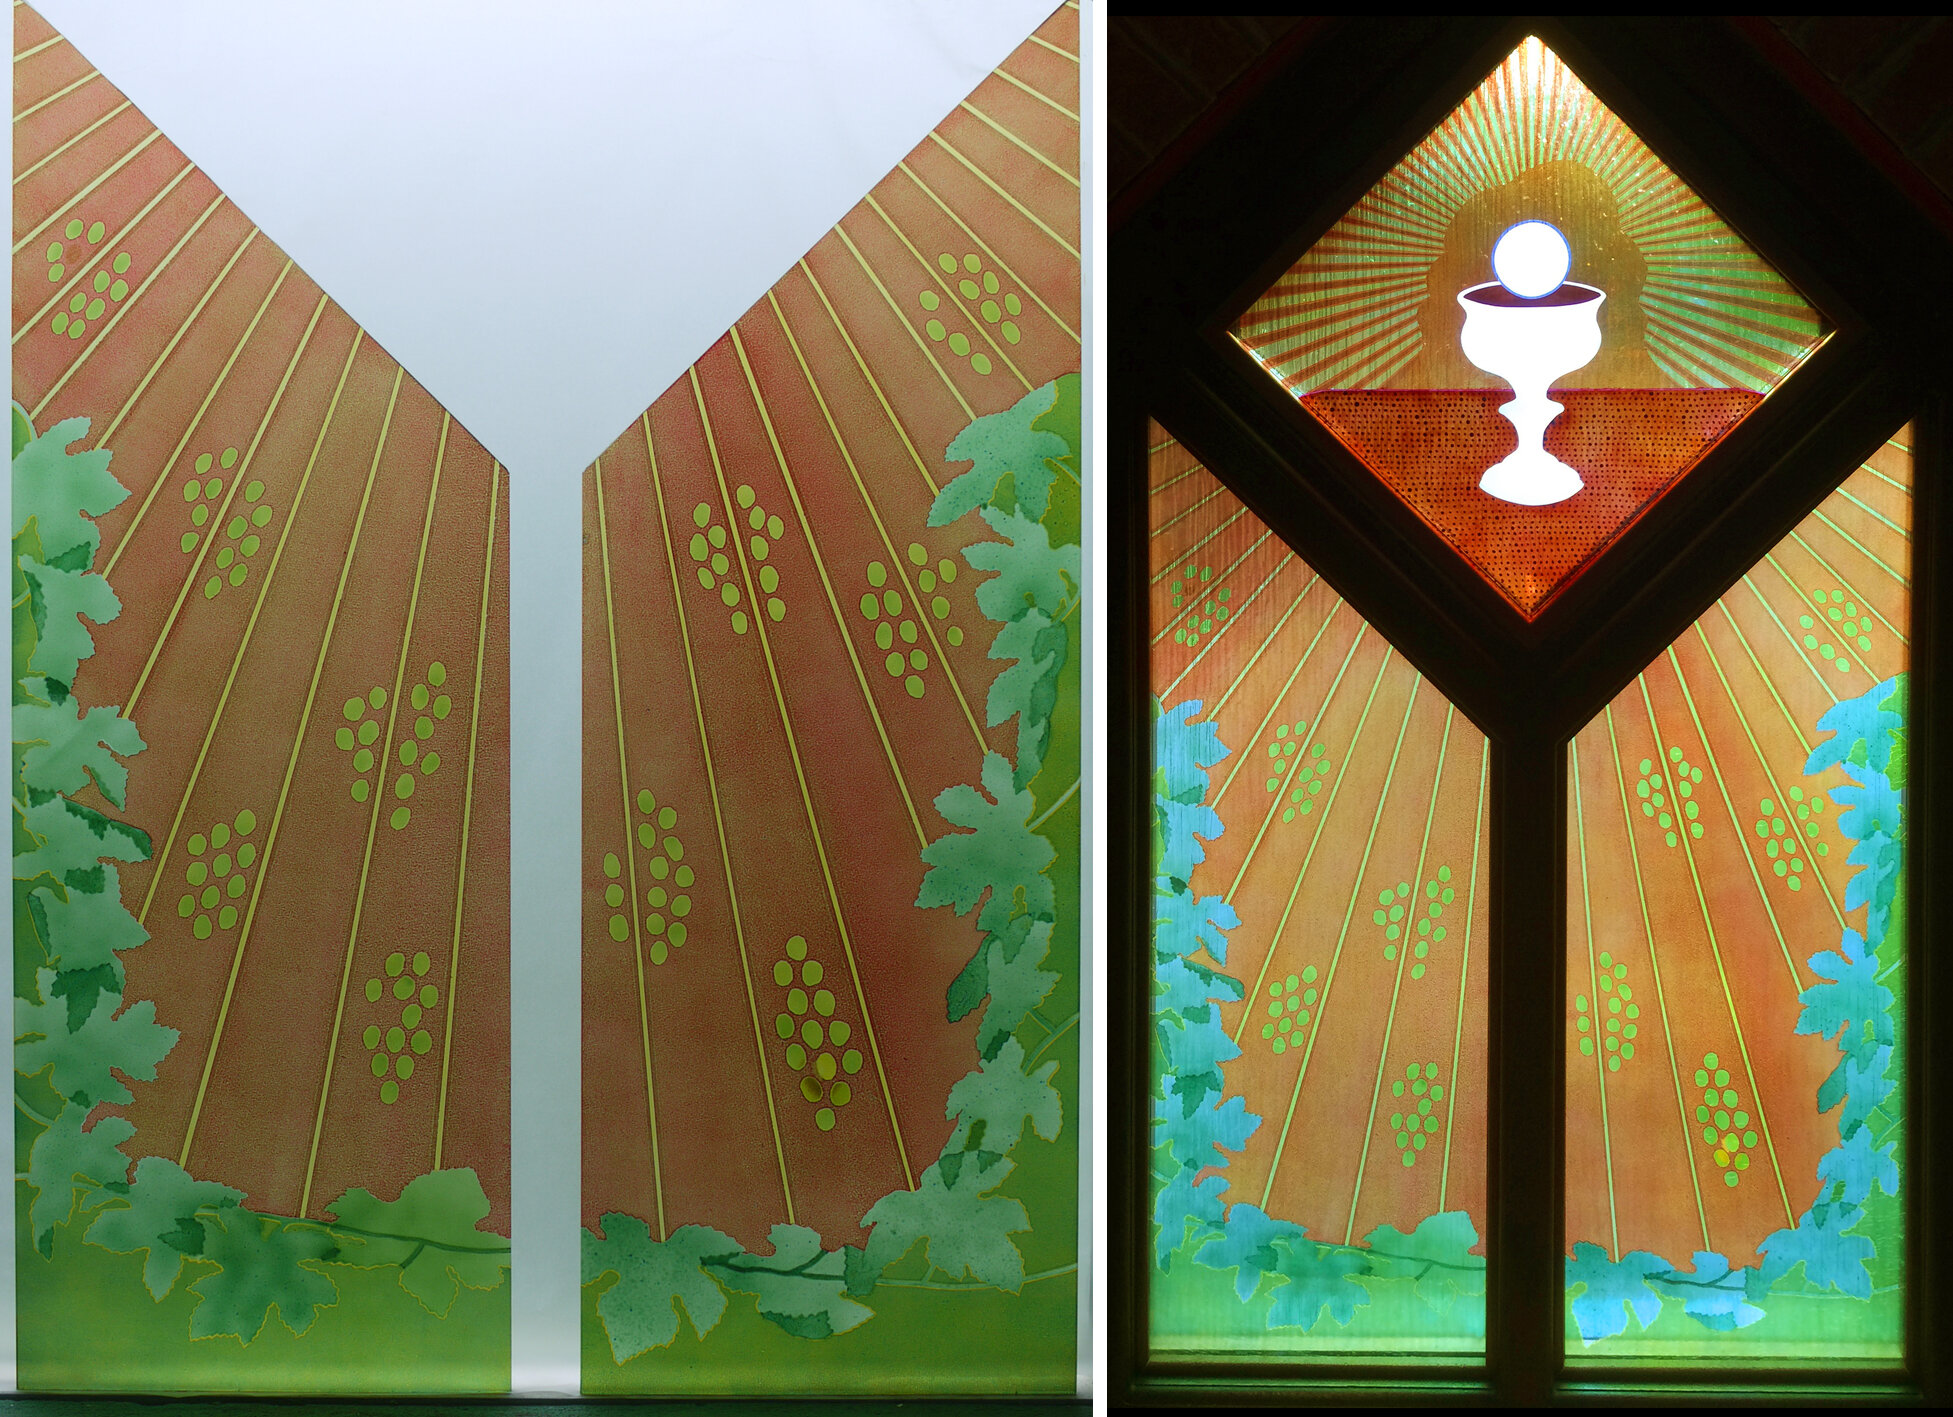
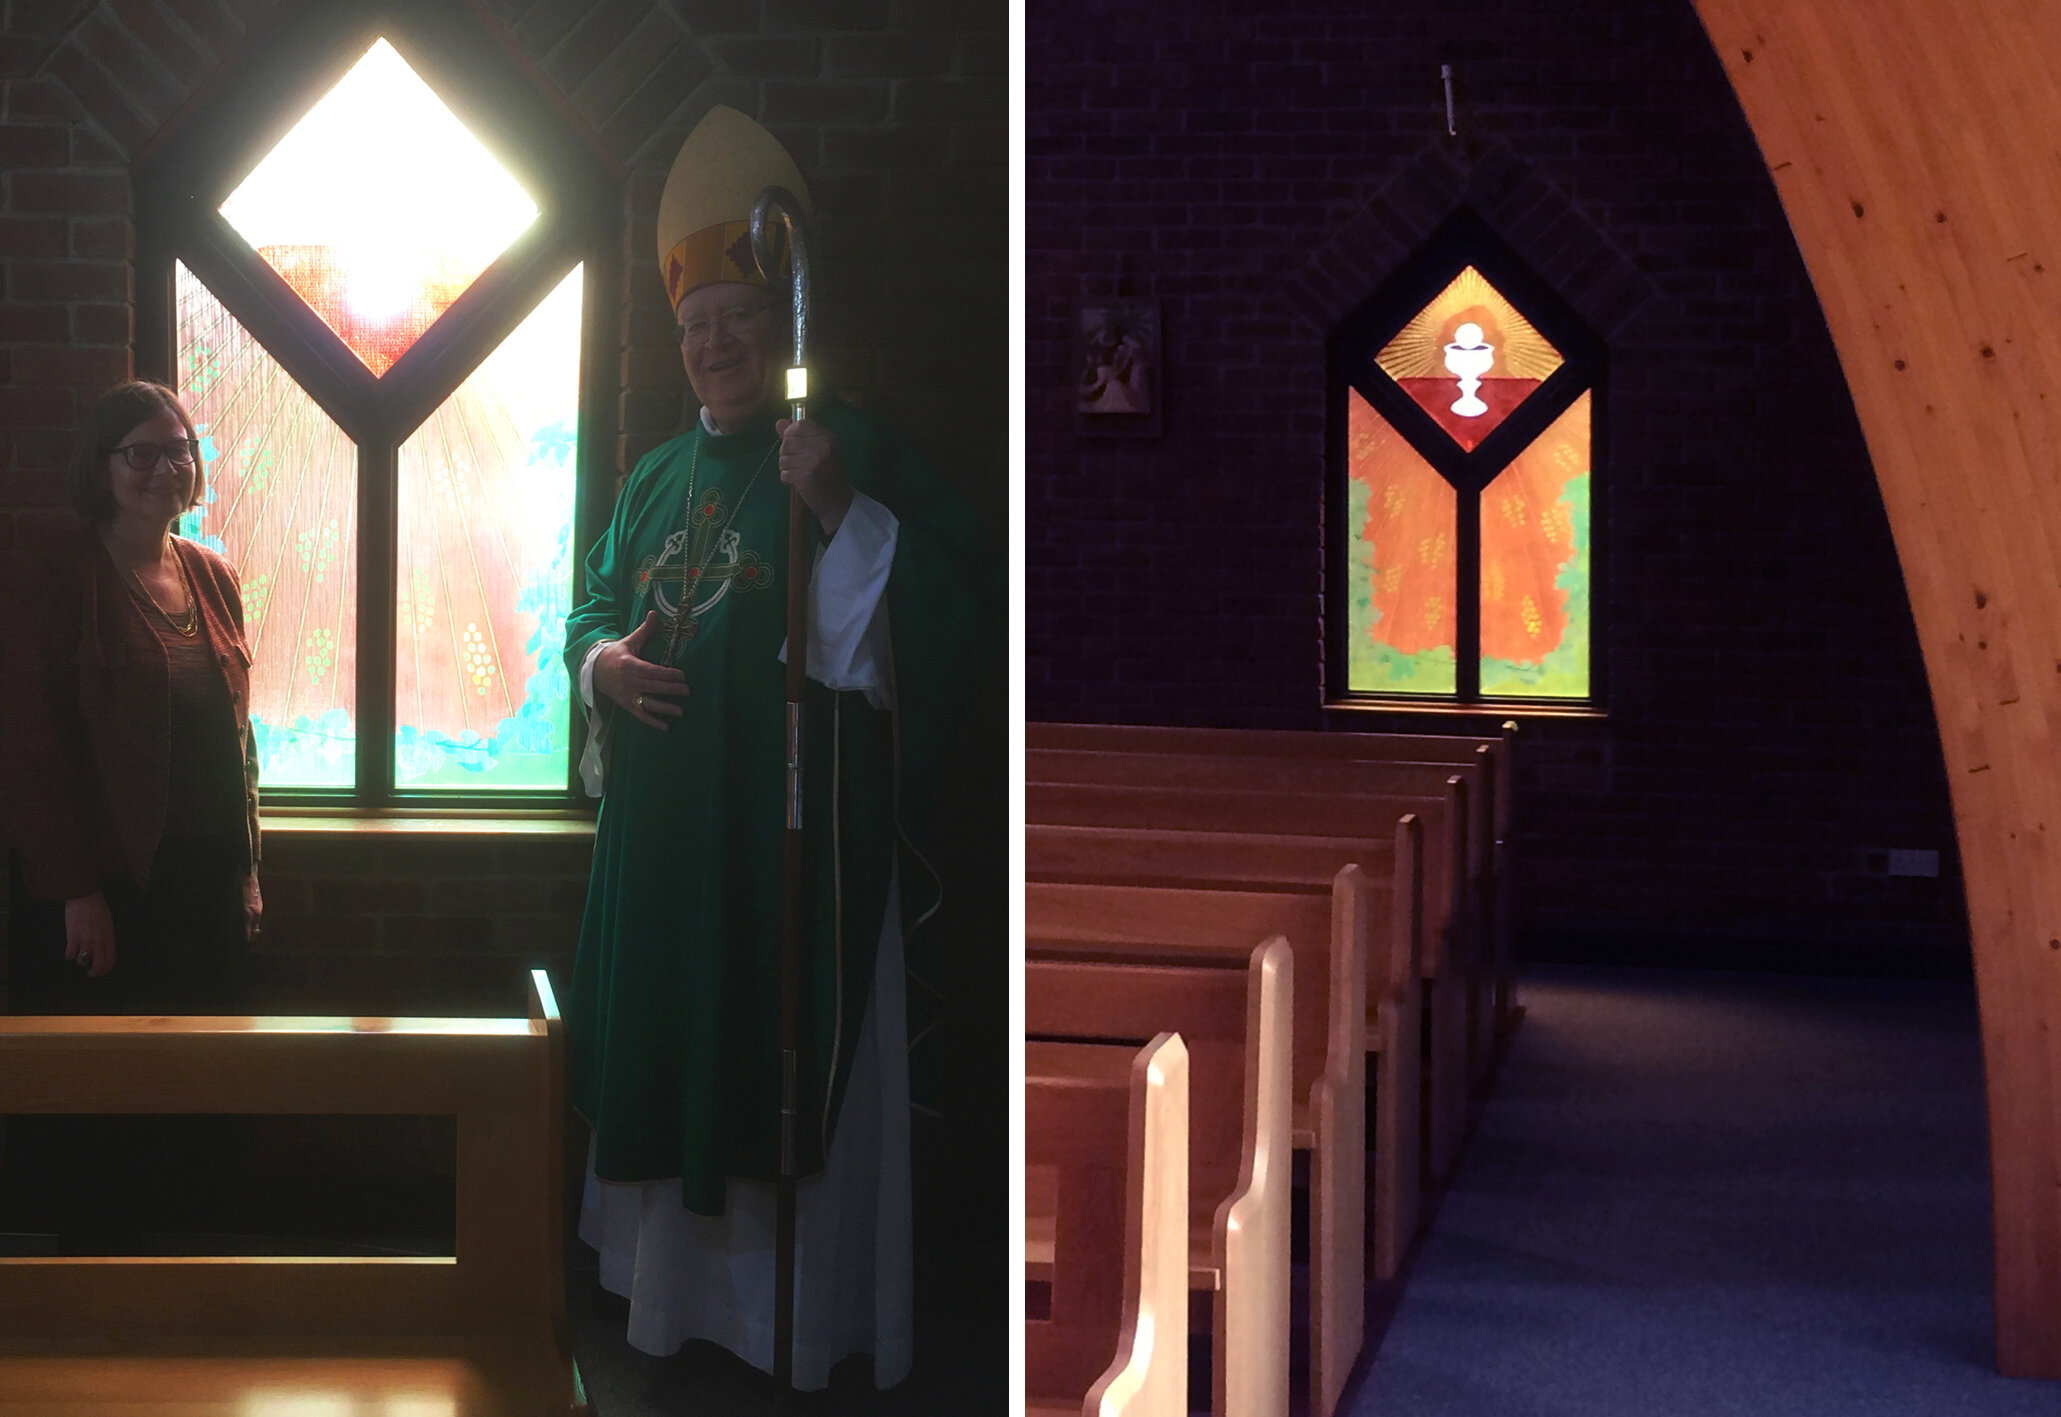
My Eucharist window for Blessed Robert Grissold Church has just been installed and blessed by the bishop in a service that commemorated 25 years of the church. The comments have been overwhelmingly positive and I feel fortunate that this modern brick church wanted a painted window and that they found me to design and make it. The focus of the window is the chalice, so I was particularly pleased that you can see it from outside (even through the textured glass that was left in place) and that it shows up so well from a distance. The parish priest was particularly pleased with the pure white of the chalice as it reminded him of the white body of baby Christ in renaissance paintings, with realistic droplets of blood on the tablecloth underneath.

Left, with Bishop William Kenney. Right, the window from a distance.

Left, with Bishop William Kenney. Right, the window from a distance.

I photographed the panels during the making stages to show how I add layers of coloured enamel, and how it changes when fired. Between the painting stages are sandblasting stages, this adds opaque texture to certain parts, and also removes unwanted fired enamel. I work out all the stages before I start work, but then unexpected things happen. Although I know what colour the enamel will be after firing, I don’t always know, despite sampling, how the colours will look together. I also make mistakes (e.g. firing on bits of the adhesive vinyl stencil or missing out a grape) which may mean a whole new stage gets added on.

Left, stage one, lower right panel. Right, stage two, fired panels cooling in the kiln.

Left, stage one, lower right panel. Right, stage two, fired panels cooling in the kiln.

Stage one (above left) shows unfired yellow enamel. The glass has been sandblasted through a hand cut vinyl stencil, some of the stencil is removed before painting, in this picture that’s the grapes, and I’m half way through removing the rest of the stencil. I handpainted some leaf and stem details in green before firing. As you can see, this pale yellow layer covers most of the glass, giving the window that bright underlying glow.

Left, stage three, lower left panel. Right, stage four, lower right panel.

Left, stage three, lower left panel. Right, stage four, lower right panel.

In stage three I added the orange layer over another vinyl stencil, you can see this clearly when the grapes and central stripes are removed (stage four above right). I added a layer of green around the border before firing - the photo of the panels in my studio window (below left) shows them after firing. It’s the same orange in the next photo (stage six below right) but shown on the lightbox where I do my stencil cutting and painting. Here the dark grapes and leaves have been sprayed with green enamel, still unfired. I thought this would be the last stage, but the greens were too similar, so I added another layer of yellow to the border and some of the grapes I’d missed out before the panels went back in the kiln for the last time (stage seven).

Left, stage five, lower panels. Right, stage six, lower left panel.

Left, stage five, lower panels. Right, stage six, lower left panel.

Left, stage seven in kiln. Right, stage seven, lower right panel.

Left, stage seven in kiln. Right, stage seven, lower right panel.

Left, stage four, top panel. Right stage five, top panel.

Left, stage four, top panel. Right stage five, top panel.

The top panel also ended up with three firings instead of the two I’d planned. In stage four (above left) you can see the unfired orange over the fired yellow and the tiny drops of dotted blood. In stage five I painted a layer of ruby enamel over the tablecloth and in the chalice - the stencil is still on in this photo. The completed panel, shown below, had an extra pink line added between the orange and ruby, and a final sandblast to keep the chalice pure and white. Three dimensional details were added with deeper sandblasted layers, while the ring of clear glass that I kept around the host is what stands out the most.

Top panel finished, left, on the lightbox and right, installed.

Top panel finished, left, on the lightbox and right, installed.

The photo of the finished panels in my studio window makes a good contrast with the one of them installed in the church. Everything looks greenish here as there is a lush garden outside, but it is also true to say that the enamel colours change in different lights and distances and that there is no one accurate colour version of the window.

Left, completed lower panels in studio window. Right, complete window installed.

Left, completed lower panels in studio window. Right, complete window installed.
St John The Evangelist by Sasha Ward

Church from the south

Church from the south

This church, at a roundabout where six roads intersect, is a Newbury landmark. It was built of local Berkshire red brick in 1955-57 to replace one completely - and uniquely in the diocese - destroyed by enemy bombs in 1943. I particularly wanted to visit when I read that the stained glass windows were made of fragments of Victorian glass from bombed out churches, including the original St John’s. These windows provide a perfect link to the history of the church as well as being one of my favourite types of decorative stained glass - just look at that startled little face below surrounded by careful borders and gorgeous pieces of pattern.

Detail from a window high up in the east end of the church

Detail from a window high up in the east end of the church

East end with painted ceilings and suspended tester: West end with flat painted ceiling and organ

East end with painted ceilings and suspended tester: West end with flat painted ceiling and organ

Other distinctive features inside the building include the tester suspended over the altar (above left) and the flat painted ceilings with lights forming part of the pattern (above right) - what a joy! The side aisles show off brickwork skills in the vaulted arches, with a row of subtle patterned stained glass roundels in the same restricted colour palette (below).

Side aisle with brickwork arches and stained glass roundels

Side aisle with brickwork arches and stained glass roundels

High up windows, mostly red and blue, one with more yellow glass

High up windows, mostly red and blue, one with more yellow glass

All of the fragment windows are in the east end of the church and high above your head. They are attributed to the church’s architect Stephen Dykes-Bower and the stained glass designer A.E. Buss and were made by the firm of Goddard and Gibbs in Shoreditch. The combination of patterned borders and geometric medallion shapes with the scraps of faces, limbs, inscriptions, buildings and the like is expertly judged. I love the way that order has come from the chaos of the broken fragments, with colours grouped together to make a set of windows that are absolutely perfect for this amazing building.

Two of the three arched windows above the altar

Two of the three arched windows above the altar

Detail from the third window above the altar with expertly arranged fragments and faces.

Detail from the third window above the altar with expertly arranged fragments and faces.

Finding Details by Sasha Ward

panel 7.jpg

People are always telling me that their favourite church windows are the simple leaded lights in pale coloured glass that allow you to see the world outside. In St Mary, Warwick, most of the aisle windows are of this type (above) showing off some great shapes in the tracery. However there is one window in the regimental chapel that is filled with light fresh colours in the upper part and delicate local details in the lower (below) where rows of soldiers march across the panes. As a lover of skilled glass painting, I always look out for a good bit of detail, then get drawn into an appreciation of the whole window in terms of colour and composition, and after that I think about the subject matter and what it means.

Regimental chapel windows, St Mary, Warwick by Philip Chatwin 1952.

Regimental chapel windows, St Mary, Warwick by Philip Chatwin 1952.

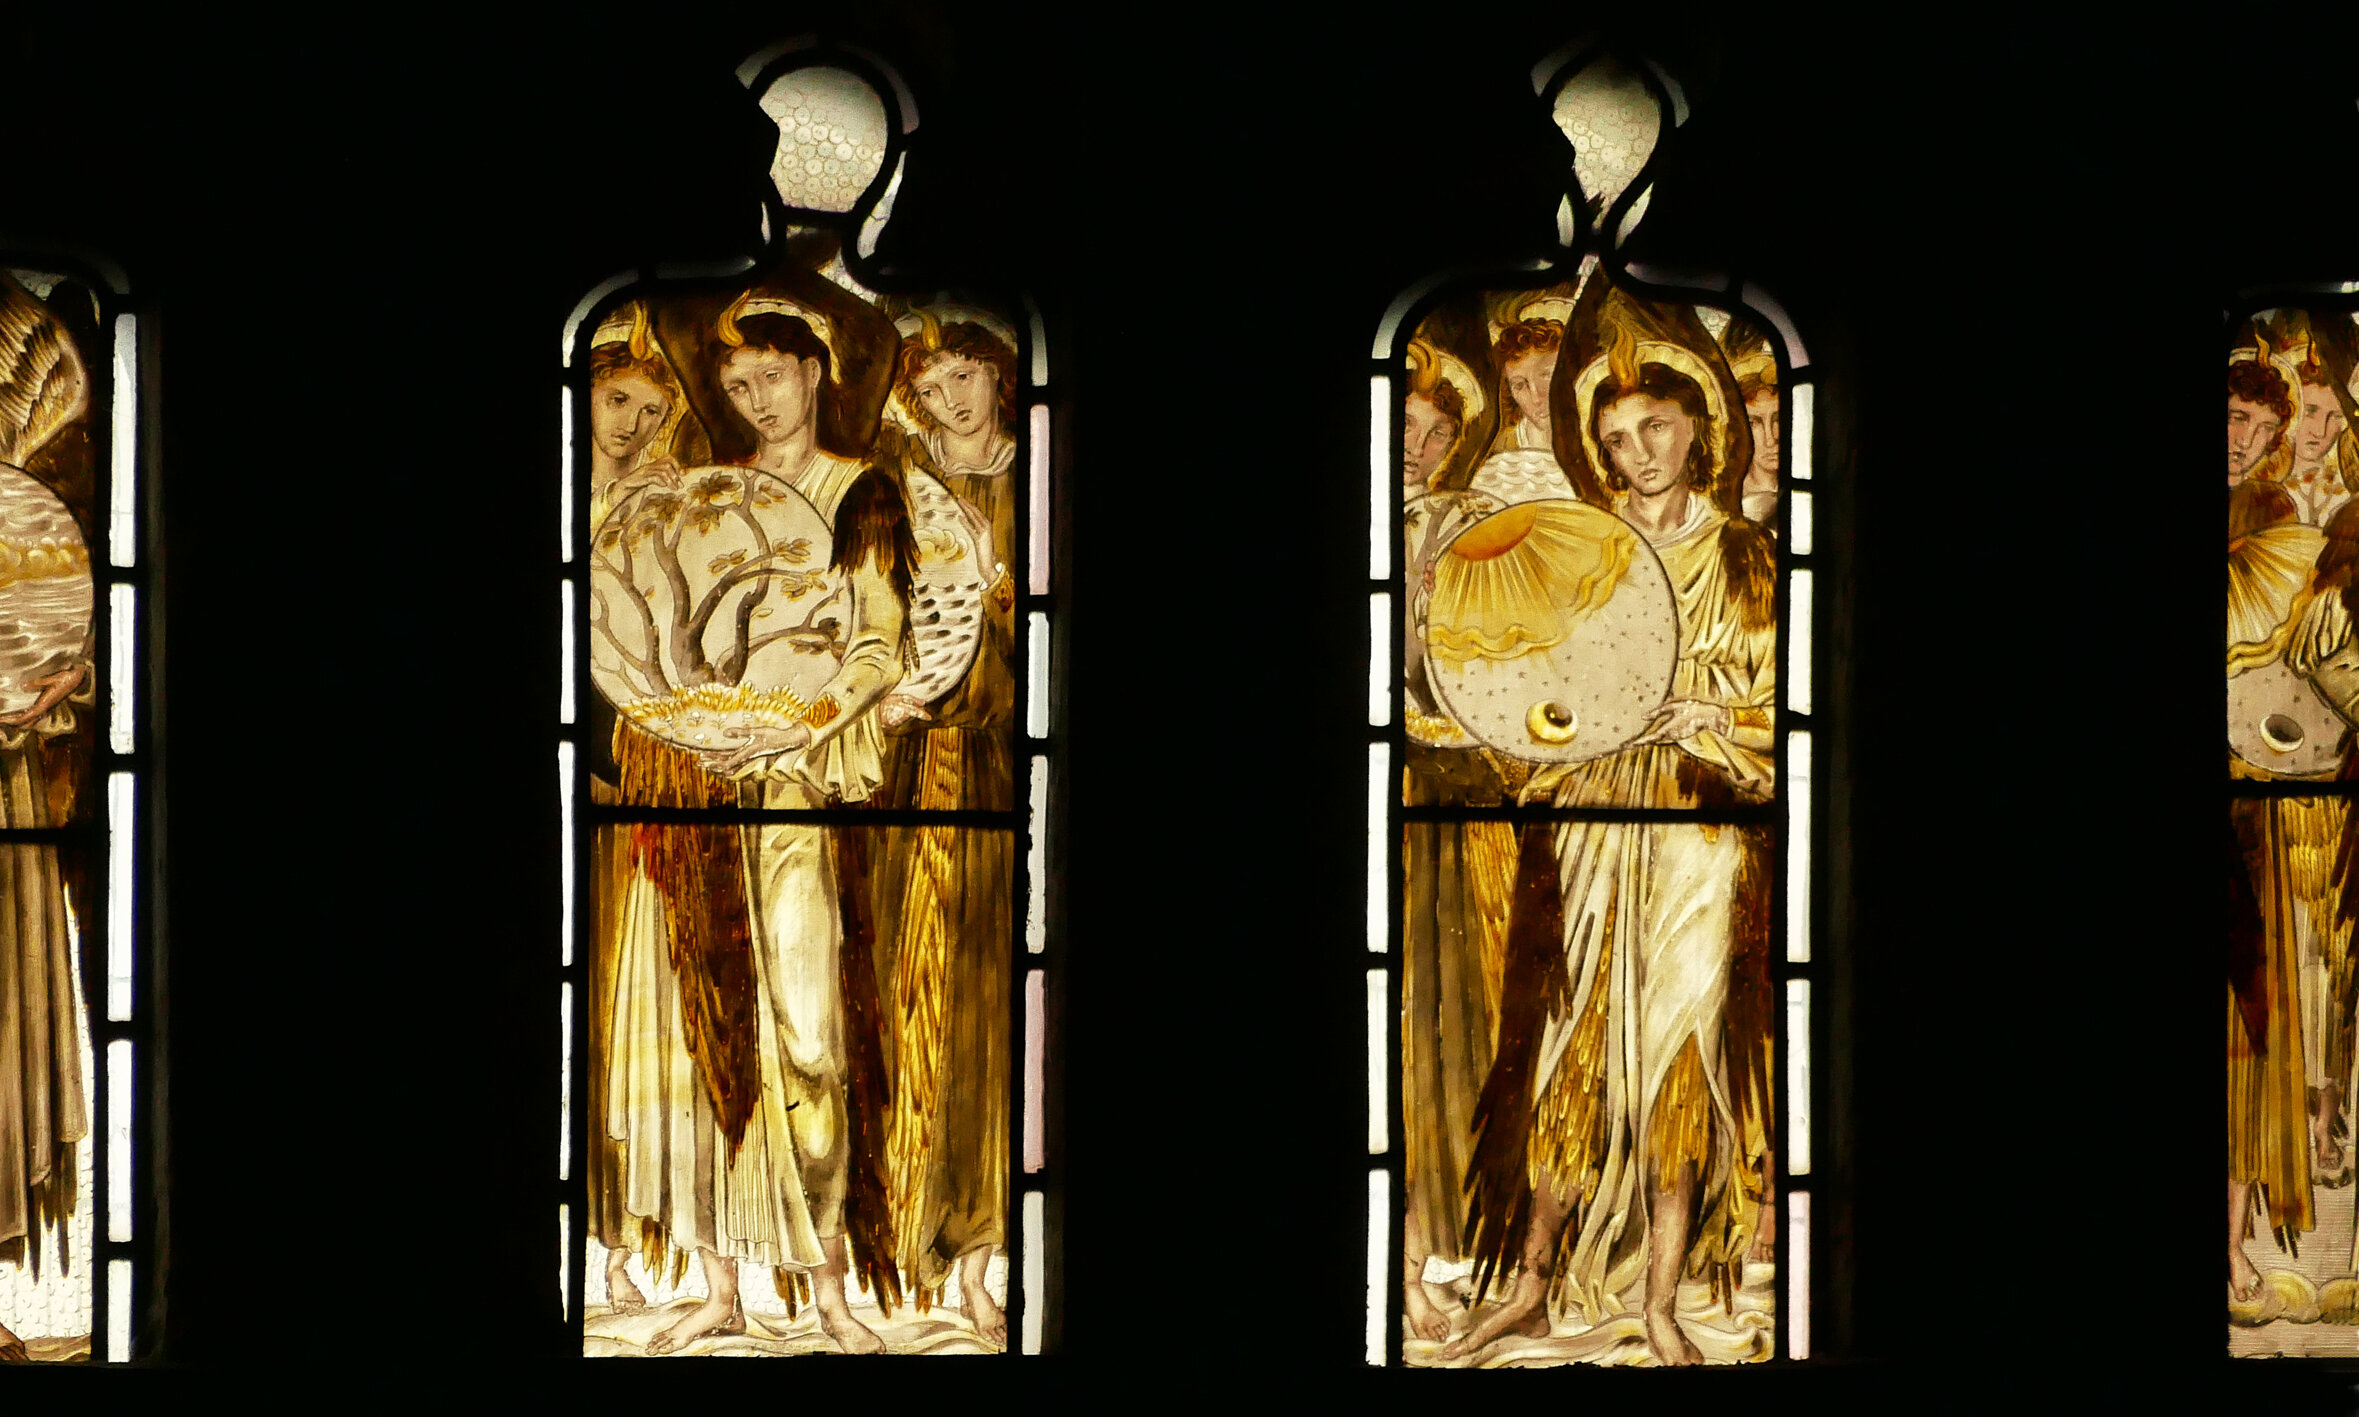
The main visit of the day was to the beautiful church at Middleton Cheney, Northamptonshire, which has a superb collection of windows by Morris & Co from different periods and with panels by most of the artists associated with the firm. By all accounts the best is the west window (below), although it’s difficult to get close enough and to see past a huge sign partly covering the bottom of the three princes in the fiery furnace. The fiery flames around the Burne-Jones figures are what drew me in here, then I appreciated the overall glow of the predominantly brown painting (so difficult to persuade clients they want a brown window but so good to see!) and only then did I think about the subject matter.

West window, All Saints, Middleton Cheney, Edward Burne-Jones 1870.

West window, All Saints, Middleton Cheney, Edward Burne-Jones 1870.

In fact the best subject matter was only revealed by the camera’s zoom lens, where I saw that the shadowy angels are sharp and delicate figures holding globes showing the first days of the creation, a classic Burne-Jones device. The backgrounds to the figures, which are painted on large pieces of glass in brown iron oxide and silver stain, are not clear but covered in a scaley pattern that modulates the incoming light.

Row of creation windows from the centre of the west window, Middleton Cheney.

Row of creation windows from the centre of the west window, Middleton Cheney.

The east window (below) includes details designed by William Morris, Philip Webb, Ford Madox Brown, Simeon Soloman and Edward Burne-Jones. The overall design of this window is striking and subtle in a different way, with the usual gorgeous backgrounds, familiar figures (such as WM posing as St Peter) and angels in the tracery. The detail I picked out is at the top where Burne-Jones’ brown and yellow crowned heads make a wonderful patterned ring around a piece of rich dark red glass with the adored lamb on top.

East window, All Saints, Middleton Cheney by Morris, Marshall, Faulkner & Co. 1865.

East window, All Saints, Middleton Cheney by Morris, Marshall, Faulkner & Co. 1865.

There are a pair of windows in the chancel (below) where you can get close and really appreciate the quality of Burne-Jones’ stained glass figures . These are from a later period and show scenes from the life of Christ. The one that caught my eye again uses the most sombre colour scheme, with the white robes of Lazarus standing out from a rocky background, all beautifully painted with contour lines and shading.

North chancel window, All Saints, Middleton Cheney, with details by Burne-Jones 1892.

North chancel window, All Saints, Middleton Cheney, with details by Burne-Jones 1892.

East window, St Peters, Barford by Holland of Warwick 1845.

East window, St Peters, Barford by Holland of Warwick 1845.

Last stop of the day and another example of rows of figures in the church in the Warwickshire village of Barford. The east window (above) is in a colour scheme typical of its period and overwhelming as a whole. But when you break down the colour combination, and repeat it in different variations along the row of angels at the bottom of the window it begins to work, with the patterns and symbols linking the glass pieces together and with a slightly different expression on the face of each angel.

Angels from the bottom of the Barford window

Angels from the bottom of the Barford window

Colour Wheel by Sasha Ward

I decided to make a stained glass panel for my grand daughter’s first birthday with the ulterior motive of making sure she learns about colour. It’s not really a colour wheel as there are no curves. I designed it with the pieces of coloured glass all the same size and shape so I could move them around post cutting. There are also slivers of clear glass to separate out the rings of colour, with the most intense colours on the inside ring.

Left, design for the panel, working out the tessellation. Right, glass pieces cut & shown against a white wall.

Left, design for the panel, working out the tessellation. Right, glass pieces cut & shown against a white wall.

From my boxes of coloured glass scraps, I chose the lightest colours and the thinnest glass. Many of the pieces are flashed glass, only one is an enamelled colour and all of the clear glass scraps and border are textured. Once I had put them on a backing sheet with plasticine blobs, it was fascinating to see how the colours change according to their background.

Left, pieces shown against a garden background. Right, pieces shown against a sky background.

Left, pieces shown against a garden background. Right, pieces shown against a sky background.

Left, leading completed. Right, graph paper cartoon after leading.

Left, leading completed. Right, graph paper cartoon after leading.

As the pieces are small (60mm across the hexagons, 10mm width of slivers) the leading was fiddly. The most fascinating photo (below right) is the one of the colours projected by the sun on to the floor, I’ve rotated and flipped it so you can compare colours across the photos. You can see that at this angle the shadows of the lead obscure the clear slivers and also the purpose of textured glass as it sends the light out in all different directions. The enamelled piece is the pale lemon one, the most perfectly clear.

Left, completed panel against tracing paper. Right, paper removed and the sun came out.

Left, completed panel against tracing paper. Right, paper removed and the sun came out.

Moving Windows by Sasha Ward

Rectangular fanlight window, private house Devizes, 2004.

Rectangular fanlight window, private house Devizes, 2004.

Occasionally friends commissions me to make windows for their houses. These commissions often provide an opportunity for me to do what I think would look good in the space, rather than design something to a theme that has to be approved by a committee. The fanlight windows commissioned by friends in Devizes in 2004 and 2008, shown above and below, show my preference for order and geometry. They looked good installed above the front and back doors and when the friends moved they wanted to take them to the new house, although not quite sure of where they would fit.

Square fanlight window, private house Devizes 2008.

Square fanlight window, private house Devizes 2008.

Detail showing quarter circle and original collage design.

Detail showing quarter circle and original collage design.

Rectangular window moved to private house, Bristol and during installation (with coincidental matching t-shirt design).

Rectangular window moved to private house, Bristol and during installation (with coincidental matching t-shirt design).

It was perfectly easy to take the glass panels out, give them a good clean and find them new spaces. The rectangular window had its ends chopped off and was put in front of the existing reeded glass above a bedroom door. The bar that divides the window in two goes well with the sandblasted lines on the design, which flew out of the sides of the panel even before the chopping.

The square window, which has always been one of my favourite designs, was easy to miss in its previous high up home so in the new house they wanted to hang it lower down in one of the conservatory windows. As it is big (790 x 815 mm) and heavy, we had to place it on fixed rods rather than in a hanging frame with the sandblasted section, originally at the top to hide bits of the ceiling, at the bottom. You can now appreciate all the hand painted detail in this panel and it looks especially good from the outside, surrounded by plants.

Square window moved to conservatory of Bristol house, from outside and inside.

Square window moved to conservatory of Bristol house, from outside and inside.

Please don’t let the fact that you may move some time in the future put you off commissioning me, windows are very easy to move to a new place - as any church crawler knows.